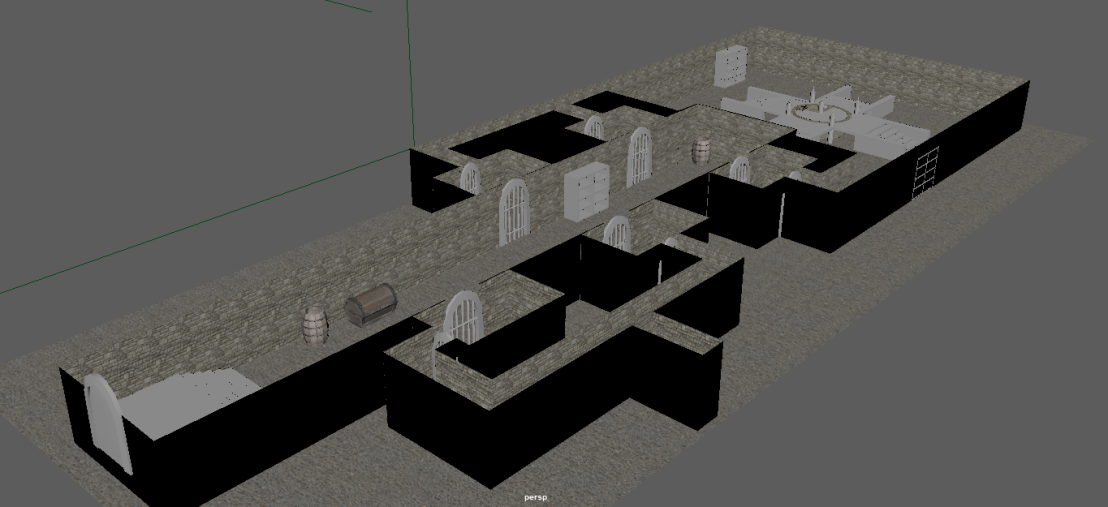
The past week has been spent modeling assets for my environment, which to be honest I feel like I could’ve put more effort into it. I was originally going to model all the assets first, and then place them into my scene. However, someone convinced me that I should model the walls first since this will give me a better idea of the space within my environment. I haven’t really been taking screenshots of my progression, but this is what I have so far…
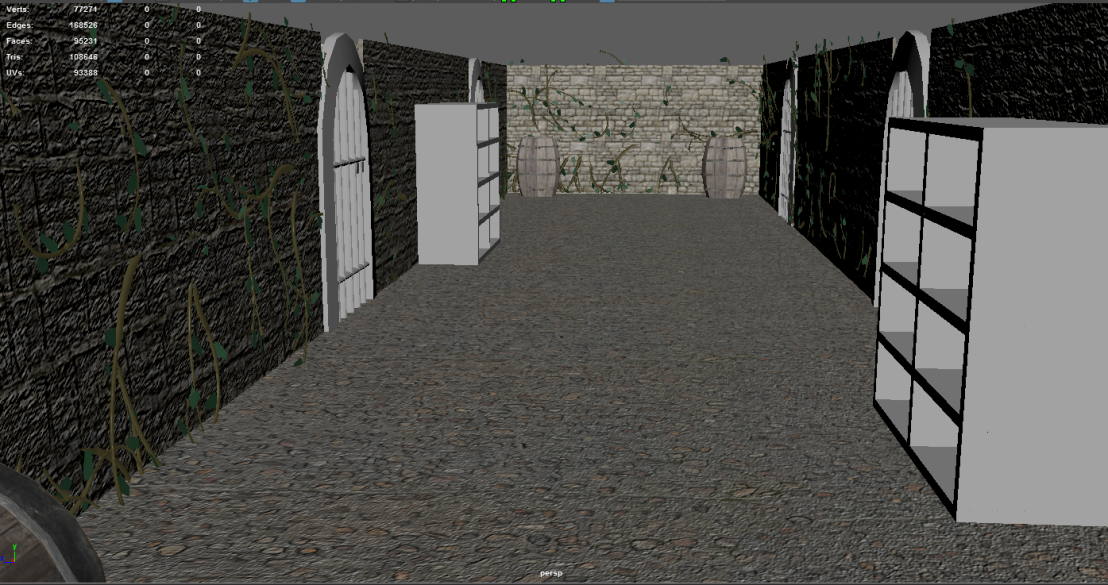
As you see within the image above, a lot of the assets aren’t textured yet. I plan to do the texturing with the next few days. You may have noticed that I haven’t implemented a square well that I was originally going to model. After some feedback, I was told that the dungeon itself was generic, so I did try my best to be creative…I decided to model some sort of altar, which is still generic, but not as generic as a well. With the dungeon itself though, I was told that the walls are too plain, which this is the main factor why my dungeon looks generic. After a few days thinking about how I could make my dungeon look a bit more interesting, I finally decided to place vines on the walls.
This makes the entire dungeon look a lot more interesting in my opinion. I didn’t model the twigs and leaves, I used the twig and leaves that are accessible within the visor window. I basically used an asset that was provided by Autodesk themselves. I like the idea of having some sort of plantation within my scene, it creates a feeling that the dungeon is in fact quite old.
After messing around with vines, I decided to experiment with a fluid effect in order to create the flame for the candles within my environment. I didn’t want to simply have a glow texture, I wanted a flame that has turbulence to it, so adding a fluid effect was the way to go. After the fluid effect was created to my liking, I decided to experiment with lighting since when I tried to render the candle with default lighting it just looks a bit odd. I simply placed 1 area light in each individual room, and then placed 3 area lights in the corridor. The first attempt at lighting went okay to be honest, but it didn’t really create the atmosphere I wanted though.
As you see I haven’t added a roof yet, but this will be done eventually. I’m extremely happy with how the candle turned out, but the dungeon itself looks more like a basement and not a dungeon. I attempted changing the colour of the area lights since colour can affect the atmosphere of an environment, which I decided to go with a green colour…this didn’t turn out the way I expected.I simply applied too much green, which I could’ve lowered the saturation down a bit to only have a tint of green. This would’ve made the environment look better, but that was not the case. I only went with green due to having plantation in my environment, I thought it would’ve been a nice contrast.
As you see, I applied a dark green colour and this obviously made the environment extremely dark. For some reason, It looked fine on the Maya render window, but became too dark when I exported the rendered image as a .PNG. Even so, I didn’t really feel like the green colour created the atmosphere I wanted, so I decided to go with a blue colour. I obviously considered the saturation this time as well as the brightness of the environment after applying a dark colour for area lights.
This time you can see a blue tint to the environment, which you can clearly see a big difference within the atmosphere. The atmosphere feels cold, which this is a common convention of a dungeon. The dungeon itself feels like a dungeon and not a basement. I am extremely happy with the lighting, which I’m glad that I spent an hour messing around with the lighting. My dungeon doesn’t seem so generic no more in my opinion.
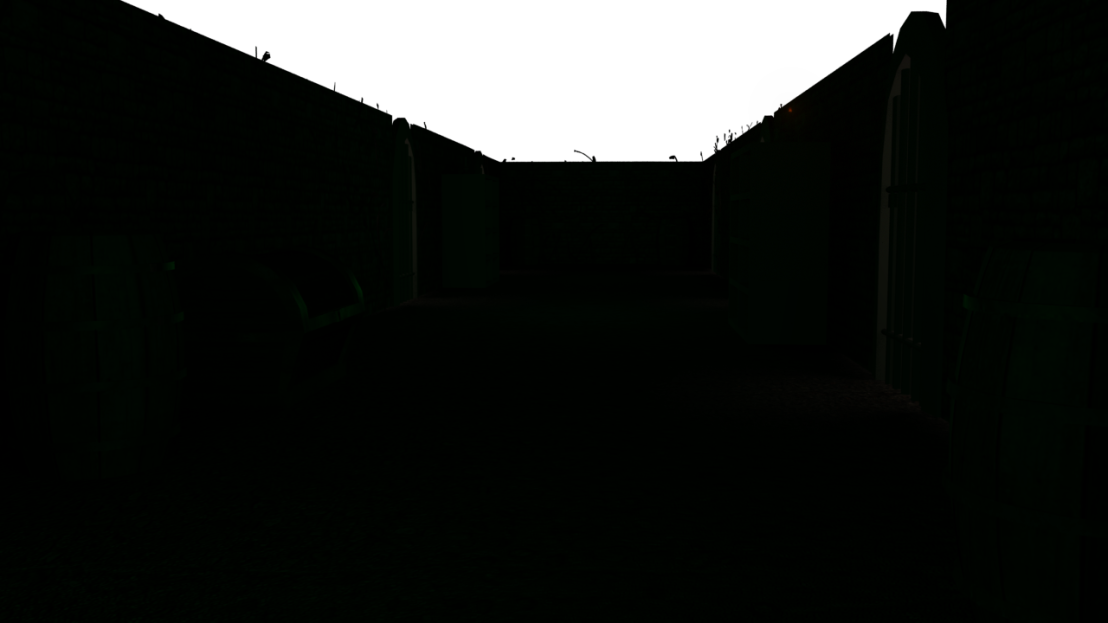
For some reason the exported rendered image looks drastically different from the Maya rendered image. I have literally no idea if this will affect my walkthrough, but that is a problem I plan to encounter in a few weeks time. I exported the same rendered image as both .PNG and .JPG and it seems that .PNG format makes the rendered image darker than the .JPG format. Since I have a VGA cable going into 1 monitor and a HDMI cable going in the other monitor, I can see a big difference when viewing the image on both monitors. The monitor using HDMI shows the image to be brighter than the monitor using the VGA cable.
The rendered image within Maya looks fine on both of my monitors, I think there’s just some sort of problem with exporting…I have literally no idea. The same problem did occur when trying to export the rendered image of my barrel, the exported image is drastically darker than the rendered image within Maya.
I did simply copy and paste the fluid effect for all the candles I have in the scene. My next task is to to either texture the assets I have modelled already or model the other assets that I plan to place into my scene. I do believe I could put so much more effort into this project, but I need some sort of motivation. I do plan to do the project, but lately its been taking me ages to do a simple task that I set myself. I would take a few days off and simply relax, but the deadline is less than 3 weeks away now.Since I am doing a relatively simple dungeon though, it shouldn’t take too long.
Over the past week I have done quite a lot of work to be honest. Since I did technically finish my research early, I decided to get a head start on creating the assets for my environment.
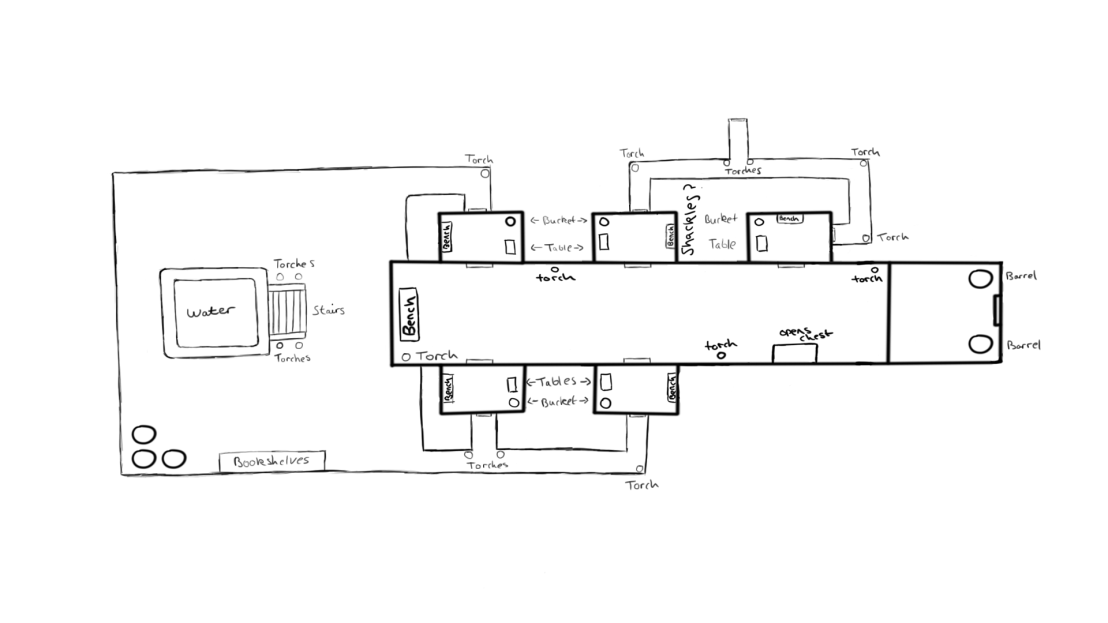
However, before we talk about the assets let’s talk about the level design. If I didn’t create some sort of level design, then creating an environment would be far too difficult. While creating the level design in class, the lecturer told me to think about how the camera would travel through the scene. He told me that I should think about the camera and that I should have it like a roller coaster in some sense. For example, making the camera go into a room, and then making it leave the room by having it turn around would be slightly boring. It would essentially be a generic architecture walk through. I don’t want that. The lecturer told me to try to make the camera loop, so it essentially avoids going backwards. From the advice the lecturer gave me, I decided to elaborate on my level design. From the finished results of the level design, the camera will not go backwards by turning around. I have made the level into some sort of loop, which to be honest looks so much better compared to what I had before.
I plan to have the camera travel through the tunnels, which has the loop I spoke about earlier. Once the level design was done however, I decided to start the storyboard. This was completely different from previous projects that I’ve done since there isn’t any characters in this project. Each panel that I’ve drawn shows the progression throughout my scene, I feel like I haven’t really thought about the composition that much. However, this is definitely something that I will think about when placing the assets into each room. For example, we have looked at the term mise en scene which this basically means how you arrange the scene. You need to think about what you want the camera to show. Since I have 5 rooms in my environment that are very similar, I plan to place assets in different locations. However, since I want to make the environment seemed haunted, I plan to place the assets so it seems like its been knocked over by someone. Not all the assets will be knocked over, but this is where I need to think about what I want the camera to show.
This slideshow requires JavaScript.
I mentioned earlier that I have already created a few assets. First of all, I created a tillable plane, which was relatively easy to set up. Once this was done I applied a seamless texture, which this allow me to duplicate the wall and place it next to another wall and seem like the connect to each other. Since the wall looked a bit flat, I decided to download a magnificent plug-in for Adobe Photoshop that allows me to generate a normal map for any texture. Adding a bump map gave the wall a more realistic look. I was extremely happy with the outcome of the wall, which from doing the wall I have learned a lot more about bump maps, seamless textures and actually how to create a tillable plane.
This slideshow requires JavaScript.
The second asset that I created was a chest. After looking at many references, I decided to model a combination of few of the references that I looked out. Creating the chest itself was really simple to be honest, which I do believe that the poly count is just under 300. I did show the lecturer my chest, which he seemed to like it a lot. This made me happy. However, he did question whether or not I was modeling for games or for film. I do know the difference between film and games…films are pre-rendered, so having high poly count doesn’t really matter. However, video games themselves aren’t – obviously apart from cut scenes within games. It’s also due to hardware constraints as well, but I don’t want to go too much in-depth.
However, once I created the chest, I decided to sort out the UVs since this is needed before I start texturing. The UVs took like an hour to do, but this is only because this process involves trying to prevent distortion. Firstly I began by applying a texture that is simply a bunch of squares. So after apply cylindrical mapping to the top of the chest and planar mapping for the bottom of the chest, I had to make sure the squares looked like squares, not rectangles. Having squares will prevent distortion. I didn’t really take a screenshot of me doing this, which I wish I did now to show how I developed the asset. I just have too much fun modeling and just simply forget to take screenshots throughout.
– I use this texture for every asset I create, I seriously wouldn’t know what to do without it.
Never the less, once the UVs were done, I simply created a PSD file within the UV editor. This will allow me to apply textures more accurately compared to if I just simply slap on the texture through the material editor. I applied a wooden and metal texture for the chest. Since metal tends to shine, I decided to add a specular map. In order to create a specular map you first to assign a blinn texture preset to the asset. This made every shiny, even the wood, but this is obviously something that I didn’t want. I took the diffuse map that I previously created, and simply lowered the saturation down on both the metal and wood. However, I lowered the brightness of the wood till it basically looked black and raised the brightness of the metal till it looked whiteness. Black absorbs light and white bounces of light, that this just common sense. I’ve never created a specular before, but I knew how to do it. I am extremely happy with the outcome of the chest.
This chest looks slightly old, which this is obviously due to the textures. I picked those textures for a reason. Since the dungeon I’m creating is quite old, it would make sense that the chest would look old as well.
This slideshow requires JavaScript.
The last asset I created last week was a barrel. This asset was sort of annoying, but that’s because I had to make many alterations to it. I created the barrel by creating one piece of wood, and then simply attached it to a spline and then extruded it. I simply made the spline into a circular shape, which this created the circular shape I wanted for the barrel. However, after showing the lecturer the barrel he told me that it doesn’t really look like a barrel since it had gaps within each piece of wood. He told me to look at a reference and not to try to model something using my head, always use a reference. I guess I was just imagining what a barrel looked like, which that was my mistake. From the advice the lecturer gave me, I spent like an hour just merging the vertices from one wood plank to the other.
After merging all the vertices, I realised I didn’t delete the faces on the side of each wood plank since now this is irrelevant. I had to go through the trouble of deleting each face, but this was easily sorted within 5 minutes. I used the torus shape and lowered the subdivisions to create the ideal metal ring that I wanted for the barrel. Since the barrel is now finished, it was time to do the UVs. I applied a cylindrical mapping to the wooden planks and a planar mapping to the metal rings. I did the same like I did last time, I created a PSD file within the UV editor to accurately apply the textures that I want. Since I applied a cylindrical mapping to the wooden planks, it was really to determine each individual plank of wood, which this allowed ease of applying the texture. I still may make changes to the metal rings since the metal texture does look slightly odd in my opinion. I do believe I should have applied a cylindrical mapping to the metal rings since the metal rings are a circular shape. This is something that I plan to change, but my main priority at the moment is to create the different assets I want inside my scene.
This slideshow requires JavaScript.
Since I have a pitch tomorrow, I should find out whether or not my environment will be appropriate for the project brief. I don’t plan to do any more modeling till then. However, I do however plan to model straight away after the pitch. I need to create a metal prison gate, which I hope to finish tomorrow. I do plan to apply a specular map to the asset since I want it to shine.
I mentioned in a previous blog post that I have 2 project briefs that correspond with each other. I was going to wait in till I finished the other project, but since I have to do a pitch next week I think writing down some ideas would be beneficial.
For this project I have to design a character in the style of a golden age illustrator/cartoonist/animator. I have decided to design a character using the style of Preston Blair. I know a little bit about Preston Blair since we had a lecture about him, but I do plan to do a lot more research. I also plan to borrow a book from the library that he created and published. The book is called, “Cartoon Animation”. Since I’m not the best drawer, reading this book will definitely help me improve my drawing skills.
This project also requires me to write a back story, which will help me set the scene for the other project brief. The back story needs to be around 800 words, which to be honest shouldn’t be too difficult since I have a pretty good idea on the character I want to design. I also need to produce a turn around, which is simply a front, side and back view of the character. An expression sheet is also needed, which should contain at least 5 facial expressions. The final task is to create 2 story telling poses.
I want to design some sort of knight character since I have an obsession with anything medieval. I wanted to go with the idea of implementing some sort of folklore. You know when people tell stories involving legends/fables, I want to tell that sort of story.
This is a brief summary of my idea: A story is told throughout the village about a dungeon that consumes whoever enters it. However, there is also rumours about extremely rare treasure in the same exact dungeon. Many adventurers have tried to obtain the treasure, but for some reason the adventurers tend to go missing.
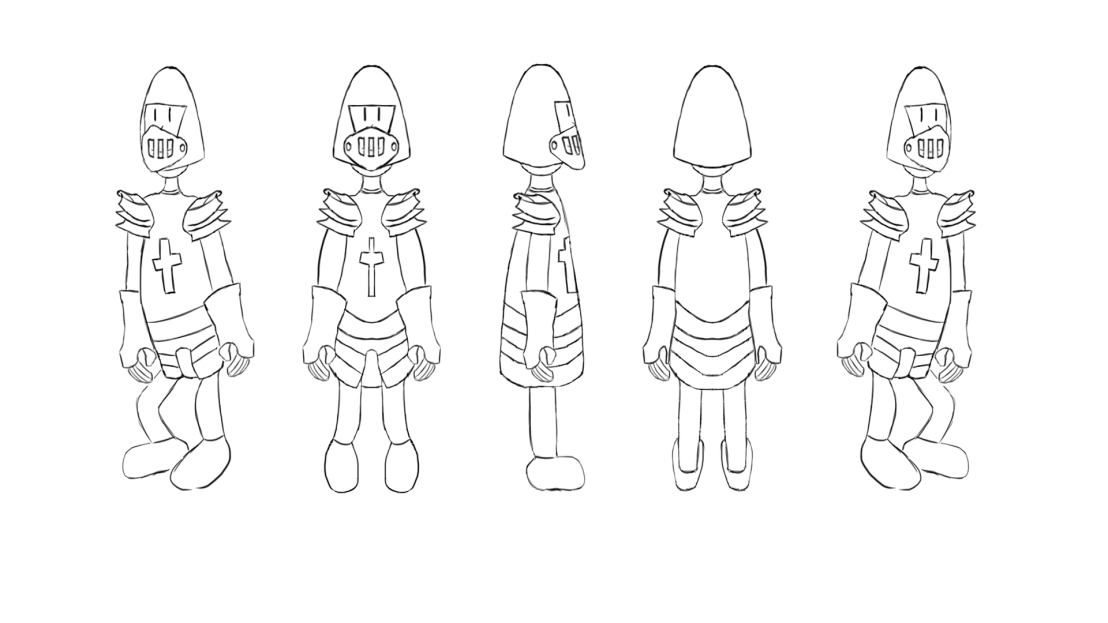
Over the past few days I have been trying to develop a character using the style of Preston Blair, which I must admit has gone really well to be honest.I have created a turn around of the character that I’ve designed, but this was only done because of the research that I did beforehand. Before I show you the turn around, I’m going to show evidence of my research.
I’ve mentioned in many blog posts that I’m not particularly good at drawing, but the book that I borrowed taught me about construction. From looking at construction, I suddenly realised that most of characters designed within the golden age are simply basic shapes like circles, triangles and squares.
From this, I decided to have an attempt at designing a character using simple shapes. I didn’t really incorporate line of action yet since this is sort of irrelevant for a turnaround. However, I do plan to incorporate line of action for when I do my 2 story telling poses.
I have looked at the different animated films that Preston Blair helped create, which even here you can see that the characters are essentially based of simple shapes. For example, Senor Droopy (1949) the character Droopy is essentially made up of 2 ovals.
From looking at the construction of previous characters, it has drastically gave me a better understanding of character construction. I do believe that if I practice this I will eventually get better at drawing. I’ve done a bit of research already, but now I plan to invest most of my time creating the environment for a different project brief. I do however plan to look at different expression sheets and line of action. Line of action will help me create the 2 different story telling poses and obviously the expressions sheets will help me create the 5 expressions that I need for my expression sheet. Never the less, here’s the character that I managed to create using Preston Blair’s style. I have tried to use simple shapes. I do plan to add colour, but this is something that’s not necessary at the moment.
Since I want to model a dungeon environment as well, I do generally believe my character is appropriate.
Finally a project that involves 3D animation. 3D animation is an animation technique that uses digital models to create designed characters and worlds for the purpose of telling stories.
I have to imagine myself to be a super hero or super villain monster or mythical creature, which I would also need to think about how the lair would look like. I can also think about things like what form would the side kick take, or if I were a villain who would my victim be? There are many aspects to think about, but this is something that I plan to think about over the next few days. I am required to create a 1 minute animated exploration of 4 internal linked lit and set dressed spaces that best represent my characters secret other life.
The research that I produce will help me develop my character, which this will help me development the environment for the project. I am also required to do a different project, which is actually relevant to this current project. I need to create a back story, turn around, expression sheet and 2 story telling poses. It would make logical sense to do that project first before creating my environment. However, I’ll have the back story done over the next few days, but I plan to do the turn around, expression sheet and story telling poses after completing the environment project.
In today’s lesson, I briefly pitched my idea to the lecturer, which he told me that I should think about a task for the character to pursue since this will help me have a better understanding of the environment I want to create. I want to create some sort of dungeon/prison environment, which is haunted by ghosts. The protagonist was simply going to be an explorer looking for treasure, but after discussing the idea to the lecturer I realised that the protagonist has to have some sort of reason to why he’s searching for treasure.
Obviously the idea is not fully generated, but I plan to do research since this will help me develop my idea. Since we have to create 3D assets as well, creating a mood board will definitely help me decide what I want the assets to look like. I have a pretty good idea what I want to have in my environment already. Since I want to create a dungeon/prison, looking at examples will help me understand what an actual dungeon/prison looks like. There are few assets that a dungeon/prison normally have, so I do plan to create mood boards for those individual assets as well.
From the mood boards, you can clearly tell that I want to model a medieval looking dungeon/prison as well as the different assets that I want to create. I plan to look at other 3D animation walkthroughs since this will give me a better understanding of what the project brief is asking for.
This was very entertaining to watch, which I do hope in the future that I can create something as beautiful as this. I just need to practice and develop my skills. This walk through of the medieval environment has somehow motivated me, which I must say is also due to the background music that was played. After watching this, I’ve also realised that I need to definitely cut the camera a few times since a continuous panning of the camera may get a bit boring for the audience. I have thought about what I want the environment to look like, which from watching this video it has made me think about whether or not I should expand on the actual size of the environment.
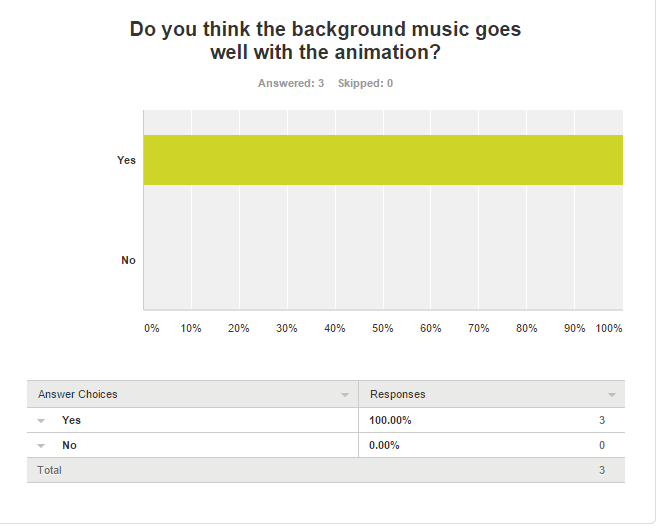
This video is very similar to the previous one, which this also shows that background music definitely makes the animation entertaining. I don’t know how to explain it, but it kind of creates the atmosphere for the environment as well. After creating my environment, I plan to spend some time looking at royalty free background music that fits the atmosphere of my environment. I would like to mention that I don’t like the fast pace camera panning towards the end of the video, it ruins the mood for me to be honest. This is definitely something that I’ll be avoiding since I want a slow dramatic 3D animation walk through.
This video is really intriguing since the camera mimics a person’s eyesight (first person). Instead of having the camera cut, I could potentially have something that is similar to this. I can pretend that the camera is the protagonist’s point of view and have the character interact with a few of the assets within the environment. Since I wanted to do a dungeon that is haunted by ghosts, I do generally believe that having the camera represent the protagonist’s point of view is the way to go. I do plan to ask the lecturer about this tomorrow. This video also demonstrates how important sound is, which if I do plan to have a similar walk through, I need to definitely implement Foley.
Never the less, I need to definitely think about whether or not to have the camera mimic the protagonist’s point of view or have the camera fly through the environment since this allows a variety of different camera angles.
From watching this video, I have decided that I want the camera to fly through the environment and have the camera cut a few times when changing camera angle. This will also allow me to improve on my cinematography as well, which is definitely something that I need to work on. I can still show the audience that the dungeon is haunted by having random assets either floating or being thrown at the walls. Having assets thrown at the wall also lets me experiment with destructible meshes. I have briefly thought about the actual size of my environment, which from watching the videos I think I need to definitely expand on the size since there are essentially a limited amount of camera angles you can show of the same location in till the audience gets the picture.
These video are more relevant to what I want to produce for the project, but this video has got me thinking about particles…since I want the dungeon to be haunted, I think adding a slight misty fog will definitely help tell the audience that the dungeon is in fact haunted. Since I want torches in my animation, I plan to create a fire particle effect. I plan not to have any outdoor lighting coming into the dungeon, so this basically means that the torches will essentially be the only source of light in my environment.
Exploring-castles.com, (n.d.). The Castle Dungeon and the Oubliette: The Truth About These Medieval Prisons. [online] Available at: http://www.exploring-castles.com/castle_dungeon.html [Accessed 8 Feb. 2016].
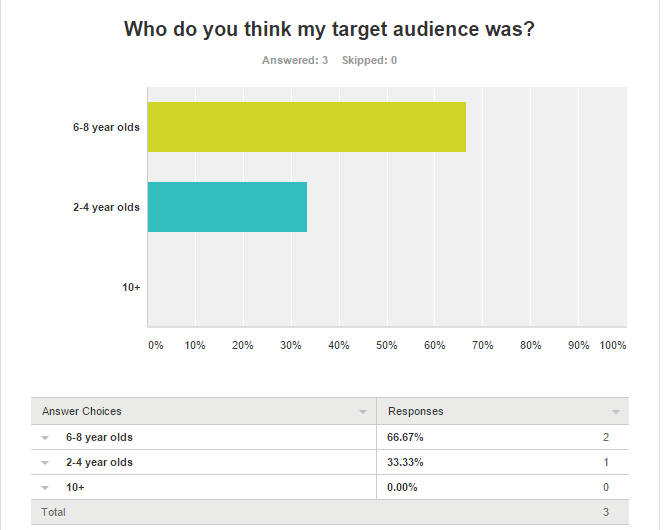
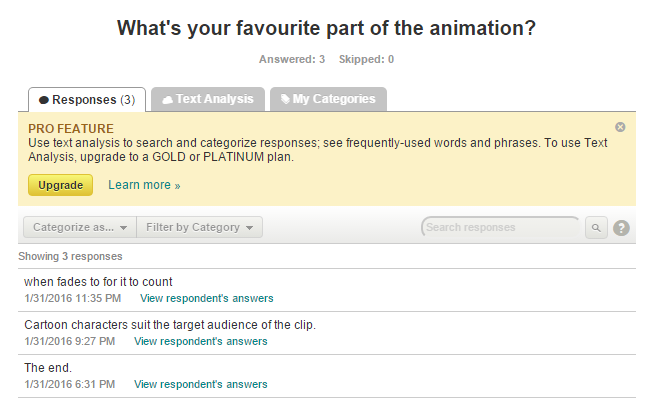
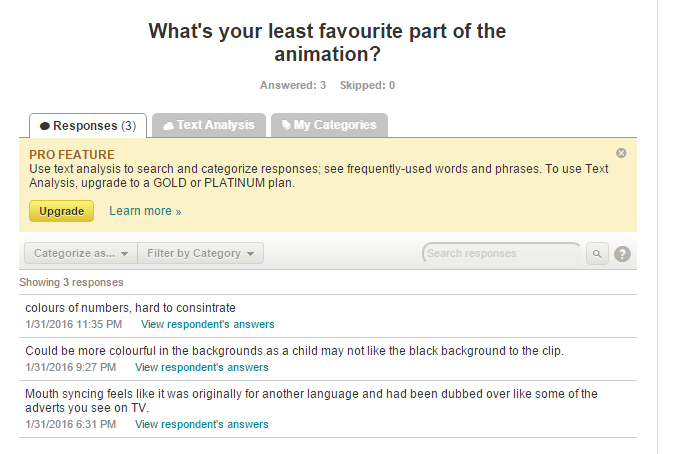
While creating the animation I continuously considered my target audience, the target audience was key. I’ve had so many comments about the colours of my finished animation…everyone seemed to like the characters and the font within my animation, but they seem to dislike the backgrounds since the characters tend to blend into the background. If I had contrast between the characters and the backgrounds, it would’ve made the characters more engaging. Even from the research I did, all the animations that I looked at had contrast between character and background. This is definitely something I need to work on in my future animations.
Lip syncing was also a major problem with trying to create my animation, but that’s only because of the bugs within Adobe After Effects. If I were to do this project again, I would definitely use a different program to create the animation. However, the only reason Adobe After Effects was the chosen program is due to the fact that we’ll be using it as a compositor for when we do 3D animation. When trying lip syncing, I found it really frustrating that whenever I assigned a specific mouth shape, it would somehow assign a different mouth shape. For example, if I wanted to make an E mouth shape, it would somehow do a F mouth shape.
I do find that from doing this project though, I have learned a lot about lip syncing. I was originally just going to have narration, but I thought this would be extremely boring since Adobe After Effects is limited to what it can do. I wanted to give the characters more life, so doing lip syncing was the way to go. It has also gave me practice for when I do lip syncing for 3D animation, since understanding the different phonemes will definitely help.
Since I did the voice acting for my animation, it was extremely weird to hear my voice over and over again. For some reason the voice acting puts me off big time, so I do hope that I can find someone else to do the voice acting for my animations in the future. The people that has watched my animation somehow likes the voices…I got a comment about having someone else do the voice for Dr. Boinky since you can tell the voices for both of the characters came from the same person.
While creating the animation, I was originally just going to leave the font a white colour since I thought this was a good contrast between black and white. However, I went against the idea since I had to think about the target audience. I had to make the animation look a lot more fun, so adding colour was definitely needed. Also since I wanted to have a title page, I wanted to incorporate some sort of font that is relevant to children. I decided on a crayon font since children around the age of 6-8 tend to use crayons a lot. Incorporating colour was extremely important.
I just feel really bad since there’s limited movement to the animation, but that’s only because of the program I was using. I was unable to use the puppet warp tool since my character was too complicated. I did attempt puppet warp, but it just distorted my character far too much. I wish I implemented more gags within my animation since I do feel that there isn’t enough…I somehow wish I did a fart gag, but this maybe something I do in the future.
From the project though, I have definitely got a better understanding of cinematography. Even from my storyboard, you can tell that I had an issue with framing and composition. I must admit that if it weren’t for the advice given by a lecturer, the composition and framing of my animation would’ve been terrible. Since I have a better understanding, the animations that I produce in the future will look so much better.
In conclusion, I feel like this project was simply just an exercise to experience lip syncing and to improve on my cinematography. This is not a bad thing, but having a better understanding of cinematography will help me tell my stories better. I must admit that the biggest difference of the project compared to the previous projects is the characters. The characters are more appealing but also has more personality compared to the characters I’ve created previously. I hope to create more in-depth characters in the future since I do believe that I could’ve showed more character traits with the animation I just created. However, I do feel like this was because of the limitations I had with After Effects. I sort of lost motivation with After Effects after it started playing up, so I just wanted to get the project over and done with to be honest.


